# vuepress实用功能及插件简介
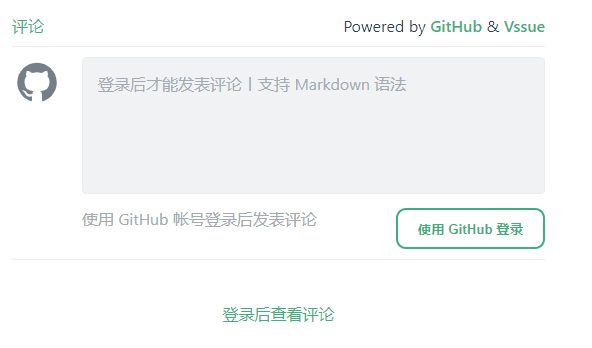
# vssue评论功能
vssue: Vue 驱动的、基于 Issue 的评论插件
提示 在你评论了一个 Issue 之后,每当有新评论,平台都会给你发送邮件提醒。有新用户在这个演示页面留下评论时,这些提醒邮件可能会比较烦人。 你可以前往 Issue 页面来取消订阅提醒(unsubscribe the notifications)。
# 配置流程
本文是基于github仓库和issues系统,配置的vssue
# 依赖安装
npm install @vssue/vuepress-plugin-vssue
# 需要登录
npm install @vssue/api-github-v3
# or 无需登录,调用次数有限制
# npm install @vssue/api-github-v4
2
3
4
5
# 基础配置
['@vssue/vuepress-plugin-vssue', {
  platform: 'github', // v3 => github,v4 => github-v4
  // 其他的 Vssue 配置
  locale: 'zh', // 语言
  owner: 'maginapp', // github账户名
  repo: 'sharing-technology-article-comment', //github项目名称 => 存储 Issue 和评论
  clientId: 'clientId',// Client ID
  clientSecret: 'clientSecret ',// Client Secret
  // autoCreateIssue: true // 自动创建评论,默认是false,避免首次进入页面的时候需要点击创建评论的按钮
}]
2
3
4
5
6
7
8
9
10
# Auth Apps设置,获取clientId和clientSecret
- 登录
github,进入OAuth Apps
setteing => 侧边 Developer settings => OAuth Apps

- 创建新项目,设置仓库名称和仓库
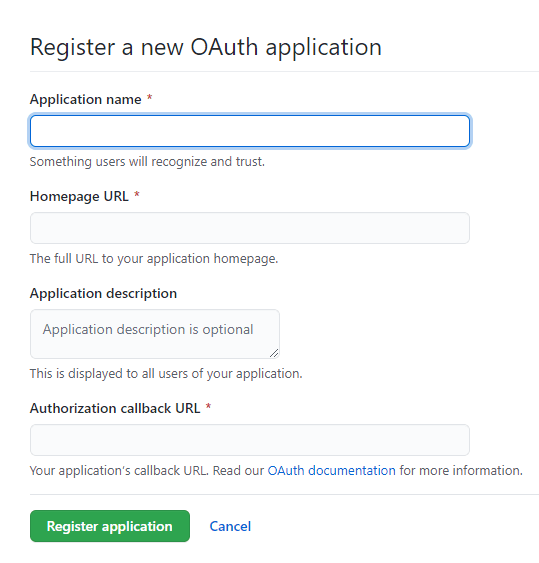
- 记录设置
clientId等相关数据

# 插件使用
@vssue/vuepress-plugin-vssue会注册全局组件Vssue,再需要添加的页面中增加<Vssue />即可生效
# 页面自动生成issue
设置配置项autoCreateIssue为true,新页面访问后会自动生成对应的issue,不用手动点击创建问题
# 页面自动添加vssue
利用vuepress的theme配置,添加vssue组件
.vuepress下创建theme文件夹进入目标文件夹拉取
node_modules\@vuepress\theme-default\layouts\Layout.vue- node_modules/@vuepress/
git clone https://gitee.com/mirrors/VuePress.git=> packages/@vuepress/
将`/theme-default/layouts/Layout.vue 复制到*/theme/layouts*下,Layout.vue做如下高亮代码:
<template>
  <div>
    <Page>
      <template #bottom>
        <slot name="page-bottom" />
        <Vssue />
        <!-- <Vssue v-if="!hideVssuePages.includes($page.path)" /> -->
      </template>
    </Page>
  </div>
</template>
2
3
4
5
6
7
8
9
10
11
- 将`/theme-default/util 文件夹复制到*/theme*下
theme下创建index.js,写入:
module.exports = {
  extend: '@vuepress/theme-default'
}
2
3
# vussue不更新问题
切换页面时,vssue模块未自动更新,还是初始页面的问题与评论 检查页面加载,发现切换页面时,会加载新页面js,直接更新网页链接,并不会跳转新页面
为vssue组件添加key,在.vuepress/enhanceApp.js中监听路由变化,进入新页面更新key,触发组件重新初始化渲染
# 方法一
此方法添加了额外的全局变量,已废弃
layout.vue: 添加全局变量layoutPage,用于获取issue的key值
<template>
  <div>
    <Page>
      <Vssue :key="vssueKey" v-if="!hideVssuePages.includes($page.path)" />
    </Page>
  </div>
</template>
<script>

export default {
  name: 'Layout',ata () {
    return {
      hideVssuePages: [], // 不显示vssue的页面$route.path
      vssueKey: 0
    }
  },
  mounted () {
    window.layoutPage = this // 添加全局变量,存储当前页面实例
    this.$router.afterEach(() => {
      this.isSidebarOpen = false
    })
  }
}
</script>
2
3
4
5
6
7
8
9
10
11
12
13
14
15
16
17
18
19
20
21
22
23
24
enchanceApp.js: 监听路由变量,进入新页面时,更新vssueKey
export default (context) => {
	const { router } = context
	if(typeof process === 'undefined' || process.env.VUE_ENV !== 'server') {
		router.beforeEach((to, from, next) => {
			if (to.name !== from.name && window.layoutPage) {
				window.layoutPage.vssueKey++
			}
			next()
		})
	}
}
2
3
4
5
6
7
8
9
10
11
# 方法二
layout.vue中监听$route.path改变键值
watch: {
  '$route.path'(to, from) {
    if (to !== from) {
      this.vssueKey++
    }
  }
}
2
3
4
5
6
7
# vuepress-plugin-code-copy
znicholasbrown/vuepress-plugin-code-copy试下代码复制功能
# usage
module.exports = {
    plugins: [['vuepress-plugin-code-copy', true]]
}
module.exports = {
  plugins: [
    ["vuepress-plugin-code-copy", {
        selector: String,
        align: String,
        color: String,
        backgroundTransition: Boolean,
        backgroundColor: String,
        successText: String
        }
    ]
  ]
}
2
3
4
5
6
7
8
9
10
11
12
13
14
15
16
# 简易锚点滚动特性
基于原生scrollIntoView开发
在.vuepress文件夹下添加enhanceApp.js文件,并加入如下代码:
export default ({ router }) => {
	if(typeof process === 'undefined' || process.env.VUE_ENV !== 'server') {
		router.onReady(() => {
			const { app } = router;
			app.$once("hook:mounted", () => {
        console.log('hook:mounted')
				setTimeout(() => {
					const { hash } = document.location;
            if (hash.length > 1) {
            const id = decodeURIComponent(hash.substring(1))
            const element = document.getElementById(id)
            if (element) element.scrollIntoView()
          }
				}, 200)
				document.body.addEventListener('click', (e) => {
					if (e.target) {
						const node = e.target
						if (node.href) return
						let url
						try {
							url = new URL(node.href)
						} catch{
							return
						}
						if (node.nodeName === 'A' && url.hash) {
							const local = new URL(location.href)
							if (local.pathname === url.pathname) {
								const id = decodeURIComponent(url.hash.substring(1))
								const element = document.getElementById(id)
								if (element) {
									element.scrollIntoView({behavior: "smooth"})
									e.stopPropagation()
									e.preventDefault()
								}
							}
						}
					}
				}, true)
			})
		})
	}
}
2
3
4
5
6
7
8
9
10
11
12
13
14
15
16
17
18
19
20
21
22
23
24
25
26
27
28
29
30
31
32
33
34
35
36
37
38
39
40
41
42
# 图片放大
vuepress官方插件
https://vuepress.vuejs.org/plugin/official/plugin-medium-zoom.html#install
# install
yarn add -D @vuepress/plugin-medium-zoom
# OR npm install -D @vuepress/plugin-medium-zoom
2
# Usage
module.exports = {
  plugins: ['@vuepress/medium-zoom'],
  // or
  plugins: {
    '@vuepress/medium-zoom': {
      selector: 'img.zoom-custom-imgs',
      // medium-zoom options here
      // See: https://github.com/francoischalifour/medium-zoom#options
      options: {
        margin: 16
      }
    }
  }
}
2
3
4
5
6
7
8
9
10
11
12
13
14
# Options
# selector
- Type:
string - Default:
.theme-default-content :not(a) > img
需要在父组件上添加类名theme-default-content,本页面添加在themePage组件上
# options
- Type:
object - Default:
undefined
options for medium-zoom